Textures are the designs applied to the surfaces of solids. These textures show what material a given solid is made of (brick, steel, sand, etc.). So, while solids give your level form, textures indicate function, create atmosphere and bring your level to life. Skilled application of textures is one of the most important aspects of creating a good level. The Valve Hammer Editor's tools give you easy access to all of the texture properties.
Half-Life's textures are stored in WAD files. A WAD file is a collection (a wad) of textures that the compile tools use to put textures into the compiled map. Texture WADs can be added and removed from the Textures options.
Note: the WAD file dates all the way back to Doom. Doom uses the WAD format to store complete level information, including map, textures, monsters, etc.
When Quake came along, the WAD format changed into the WAD2 format. WAD2 is less of an essential game file than it is a design file. It is used to store 8-bit single-palette textures. During the compile process, the compile tools take textures from a WAD2 and place them directly into the compiled map files.
Half-Life uses the WAD3 format. It is essentially the same as the WAD2 format, except that each texture stored includes its own palette. This allows for a much richer color depth than previous texture systems.
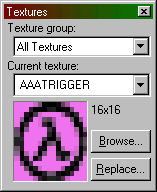
Your first encounter with textures will most likely be through the Textures toolbar.

The Textures toolbar shows the current texture, and lets you select a new texture. The Current texture drop-down list shows the last eight textures used, then continues with a list of the remaining textures. Use the Texture group scrollbox to view a different subset of textures. You will have a choice between viewing all textures, or viewing individual texture WAD3 files. (A WAD3 file is a file that contains a group of Half-Life textures). You can add or remove WAD3 files in the Textures Options dialog.
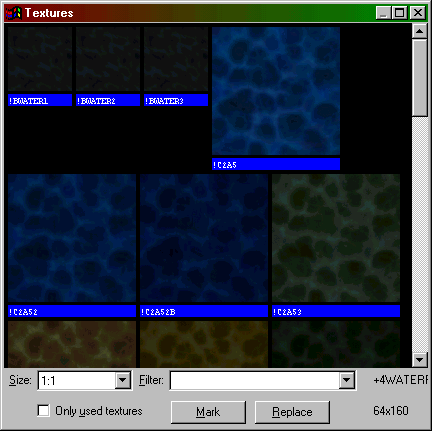
Texture Browser
The Browse... button opens the texture browser, where you can select
from all available textures (as dictated by the Texture Group setting).

The Size scroll box allows you to set the displayed size of the textures. You can choose from 32x32, 64x64, 128x128, or 1:1 (full size).
The Filter dialog box allows you to type in a search string. Any texture that includes that string as part of its name will be displayed. You can specify more than one filter string. For example, if you specify the search string "sign 7," any texture with "sign" and "7" in its name will be displayed. Previous search strings can be accessed by clicking on the down arrow.
The Only used textures option tells the browser to display only those textures that have been used in your level. This helps you limit your use of different textures, and avoid using different textures for the same purpose. For games such as Half-Life, textures are stored in the compiled maps. Reducing the number of textures will decrease the compiled map size. Fewer textures to load also means memory savings while playing the map in the game.
The Mark button allows you to mark (select) all texture faces that contain the selected texture. You can then adjust those faces as required (textures, surface attributes, etc). This is best used in conjunction with the Face Properties dialog. If the normal Apply Textures map tool is used, any brush with one face selected will have the new texture applied to every face of the brush.
The Replace button (also accessible through the Tools menu) will bring up the Replace Textures dialog.
Texture Application Mode
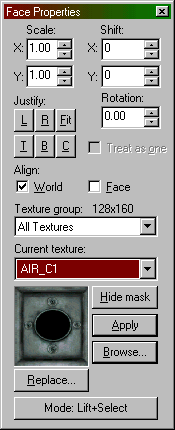
You will eventually need to modify a texture in some way. The Face
Properties dialog (Texture Application mode) allows you to manipulate
the texture properties of selected brush faces. To select a brush
face, click on it in the 3D view with the left mouse button. To
select multiple faces, hold down the Ctrl key while you do this. You
can also select multiple brushes before
bringing up the Face Properties tool.

Scale (X/Y)
You can modify the scale of a texture to shrink or enlarge it.
Numbers less than 1 shrink, and numbers greater than 1 enlarge. You
can use negative values to mirror the texture in one or both planes.
Shift (X/Y)
This simply allows you to shift the texture around in the X and/or Y planes.
Rotation
Rotation allows you to rotate the texture on a brush face.
Justify
There are six buttons you can
press here: L (left), R (right), Fit (fit to face), T (top), B
(bottom), and C (center on face). These allow you to quickly and
easily align a texture on a brush.
Treat as one
If you have multiple faces
selected, you can check this option to treat all the faces as one
single face.
Align: World and Face
These checkboxes allow you to set
the texture alignment style for the selected faces. World alignment
causes textures to be aligned according to world coordinates (if
you're familiar with versions of the editor before 3.3, this was the
standard behavior). Face alignment uses the coordinates of the face
as a basis for alignment.
Texture Group
You can select which group of textures you want to use - either all
of them, or individual texture WADs.
Current Texture
The name of the current texture
is displayed here, along with a thumbnail picture of the texture.
Hide Mask
If this button is toggled on, the selected brush face(s) will not
appear as selected (with a reddish hue). This may make it easier to
perform some texture manipulations.
Mode
This lets you select what feature you want the left mouse button to
be. The available options are Lift+Select, Lift, Select, Apply
(texture only), Apply (texture + values).