Before you can begin creating and placing solids and entities, you need to familiarize yourself with the editor's interface. By default, your working area is divided into 4 sections. The first (top, left) window is the 3D View, and the rest are the 2D views.
The 3D View
The 3D window is a dynamic 3D space where you can view your level
from any angle. This is critical for checking textures and texture
alignment, spotting leaks and just getting a sense of what your
finished level will look like.
Using Cameras
To take advantage of the 3D view, you need to be able to place
cameras. Cameras determine your vantage point(s). Hammer provides you
with precise control over the camera movements in your map.
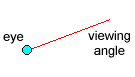
A camera in Hammer (as displayed in the 2D views) consists of two parts: the eye, and the viewing angle, which is represented by a line extending out from the eye. The length of the line that represents the viewing angle is not important, though it can help you aim the camera exactly at an object.
While it is possible to move a single camera all over the map each time you need to look at something new in the 3D window, it is more convenient to have easy access to multiple cameras placed throughout the map. Hammer allows you to easily cycle through multiple cameras by pressing PageUp and PageDown.
Camera Placement
Placing cameras in Hammer is
extremely simple. First, switch to Camera mode by pressing Shift+C,
then hold Shift and with the left mouse button, click-drag a
line in one of the 2D views. This will create a thin red line with a
large dot at one end. The dot is the camera's position, and this is
where the 3D camera view will originate. The red line is the camera's
viewing angle. You can adjust either end of the line to change the
view. Follow the above steps to create as many cameras in your level
as you need.
Note: There are a number of options available to you when using multiple cameras. You must have the Camera tool selected to take advantage of these:
PageUp: cycle up to the next camera position
PageDn: cycle down to the last camera position
Delete: delete the current camera position
Shift: hold shift and click-drag with the left mouse button to create a new camera.Tip: While in camera mode, you can adjust the camera position by moving the eye or viewing angle in any of the 2d windows.
Mouselook/NoClip Style Movement
Version 2.1 of Hammer introduced a new style of 3D View movement
called mouselook movement. It is designed to be the same as when you
are in the game and walking around with +mlook (mouselook) and the
NoClip cheat both turned on. It can be enabled or disabled by
pressing (lowercase) z.
Moving your mouse around will change the player's direction of focus, while W and S control forward and backward movement, and A and D control sided to side (left and right strafing) movement.
The old style keyboard shortcuts (listed below) still work. You can disable this new movement style by going into the 3D View options and disabling use mouselook navigation.
Keyboard Shortcuts
There are a number of keyboard shortcuts that you can use to quickly
maneuver through the 3D view without switching to the Camera tool.
While holding the spacebar:
holding the left mouse button allows you to rotate your angle of view
in any direction, while the viewing point remains stationary.
While holding the spacebar and Shift:
the left mouse button acts the same as above.