Once you've created a simple, textured solid, you can use Worldcraft's tools for refining your work. These tools include vertex manipulation, face splitting, clip planes and carving. Each of these tools lets you customize your solids by modifying the basic shapes you started with. You will find that you can achieve the same or similar effect using different tools; some are just faster and easier than others when it comes to making the precise change you are trying to make.
Vertex
Manipulation
Vertex manipulation allows you to move individual vertices and edges
of a solid, easily creating irregular shapes. This lets you make
shapes that are impossible with plane clipping, and extremely
difficult to do with carving. Vertex manipulation is also is useful
for modifying specific pieces of a group of objects, where resizing
would interfere with other objects in the group.
Note: While Vertex Manipulation makes the creation of new complex shapes easy, it also make the creation of invalid shapes easy. Remember that concave shapes are not valid within Worldcraft.
Vertices and Edges
A vertex (or plural, vertices) is a corner of a solid. Moving one
vertex will not effect any other vertex, but it will change the
position of any edges associated with it. An edge is a point between
two vertices which, when moved, will change the position of its two
associated vertices, as well as their associated edges (no other
vertices are effected besides the first two).

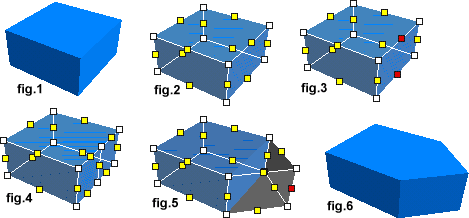
Select the object(s) you would like to manipulate. (fig. 1)
Note: You can keep pressing the VM button, or press Shift-V, to cycle through the 3 VM modes. They are: vertices and edges (default), vertices only, and edges only.
Click on the vertices/edges you want to move. They will be
highlighted (fig. 3). Note that you can move both vertices and edges.
Tip: To undo anything done in VM mode, you will have to first exit VM mode.
Face Splitting
Face splitting allows you to add additional faces to a brush. This is
a useful tool when you want to add complexity to an object in your
level. Simply select two opposing edges (fig. 3) and press Ctrl+F.
This will turn the two edges into vertices, and place a new edge
between them (fig.4).
Vertex Scaling
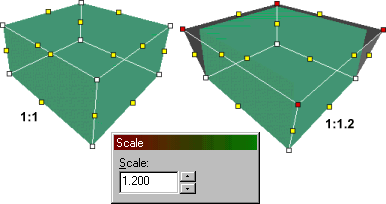
Vertex scaling allows you to select a number of vertices and change
their scale in relation to each other. The process is quite simple.
Select an object.
Clip Planes
Clip planes let you make a precise cut in a solid, dividing it into
two pieces. You then have the option of keeping one or both of the
resulting two solids. You may find using Clip Planes quicker and more
efficient than carving or vertex manipulation.
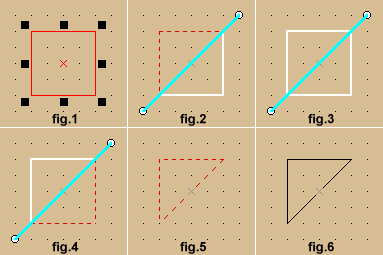
Select the object to be clipped. (fig. 1)
Note: You can cycle through the clip modes by clicking on the clip plane button, or by pressing Shift-X (fig.2, 3, 4). You can move both points of the clip line by holding CTRL and dragging one point of it.
Drag a line across the selected object. (fig. 2) This is the clip
line. The part of the object to be kept will be highlighted in thick
white lines.
Worldcraft 3.3 adds a feature to display the size of the solid area of the clipped brush. This is useful if you're trying to clip a brush to an exact size.
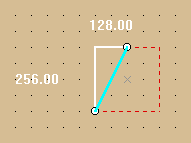
To toggle this on and off, have a 2D view in focus and press the o hotkey.
Carving
In Worldcraft, any solid can be used to carve a volume out of other
solids. For example, you can place a solid within the room's wall and
tell Worldcraft to subtract the solid from the wall -- effectively
punching a hole right through the wall! This feature is not limited
to using cubic shapes as a carving tool: any solid -- cylinders,
cubes and wedges -- can be used to carve other solids.
While carving, especially with a cylinder, it is best to carve the smallest areas possible. For example, if you attempt to create a hole in a large wall using the cylinder, Worldcraft will automatically break the wall face into several pieces, something you don't want. Instead, a more efficient way to carve would be to first carve a square hole (the same size as the circle) and leave the square in place. Then you can take the cylinder and carve a hole in the small square. This will eliminate the splintering effect for the wall.
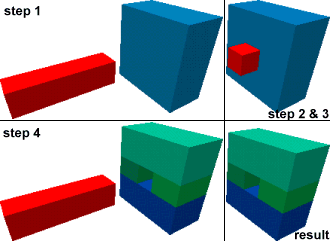
In this step, you have the object you want to carve into (in blue),
and the object you will be carving with (in red). The red object
should be selected.
Note: In the picture above, you can see that the cube (which was previously one object) is now broken into 4 separate objects. This is because the game engine cannot handle concave objects, and Worldcraft has broken it into convex pieces.