With a little help from....
- TrebTreb (Site)
- Stadric (Site)
- Steve Newman (Site)
- Sepulverture
- Zogger
- Boomstick123
- Scoobs
- Avego
- Anders
- Andreason
- Bornstein
- Danial
- Wise
- nudel
- YoMother
- Senji
- Gronblad
- Manefesto
- Drax
- Meathead
- Raidenator
- Zyx
- Sp00n (Site)
- Mynameisme
- Chrome
- Bud Doug Lee
- #1 Duck
- Flynn
- #1 Duck
- Lord Ned
- Terrenteller
- Nicadeamas
- Dinonid
- Jamie Lee
- Nero
- Maloof?
- Namelezz!
|
|
All basic tutorials are exactly that: basic. They are step by step guides
through each operation, hopefully fully illustrated. This ones assumes a bit of knowledge; that you know how to make a brush, how to hollow it and texture it, how to put a light entity in and an info_player_start.
The first few tutorials in the tutorials section are essential for newbies :-)
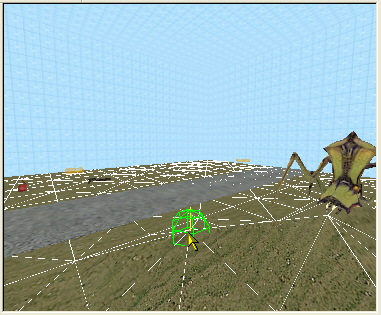
This is more on Ant_lions. This tutorial demonstrates some of the action in the Coast levels in the game. The map is mainly sand, but with a gravel path. When you tread on the sand you get attacked by Ant_lions. Tutorials has a bit about Displacements , the Env_player_surface_trigger entity, which tells the Ant_lions if you are walking on the sand. The npc_antlion_template_maker and info_node_hints Incidentally, I have put a shotgun in the map with ammo 'cos you'll need it.
- Open Hammer, click on File | New
- Open the texture browser select the Nodraw texture.
- Make a brush, 1024w x 1024l x 512h. Hollow it. ( CTRL+H) use a negative number for the wallsize.
- Texture the inside walls except the floor with the Tools/toolsskybox texture.
- You can change the sky (it always defaults to sky_wasteland02 ) by clicking on Map | Map properties
then SkyBox texture name a link to a list of skies is on the Links page. I used sky_borealis01
Displacement Brush
- Now a little Displacement. This is only very basic to give the illusion of small sand dunes in the map.
- In the Texture browser , select nature/blendsandsand008b_antlion.
- Make a brush that fits inside the map, about 32 units high. Place it about 64 units above the floor.
This isn't critical but we will be raising and lowering this surface, so it's as well to have space underneath.
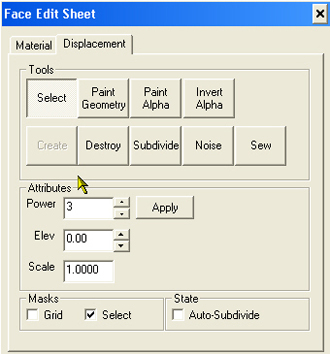
- Open the Face edit tool.
 You might want to adjust the texture scaling at this point to 0.5.
- Make sure Mode: Lift and Select is on. Click on the Displacement tab.
- Click on Select and select the new sand textured brush.
- Click on Create You will now be asked to choose the Power. This ranges from 2 to 4,
roughly the higher the number, the more triangles the brush is divided into. This means you can make more detailed changes to the surface.
- Select 3 for now. A grid appears on the surface. (You can turn this off, by checking the Grid box.)
Elev. raises or lowers the whole surface. I don't know what Scale does.
- You now have a surface which you can manipulate with the mouse.
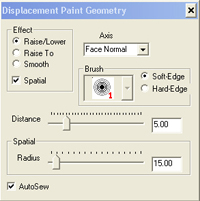
- Click on Paint Geometry. The Displacement Paint Geometry window opens.
- Make sure Raise/Lower is selected, and you find if you hold the mouse cursor over where the grid crosses,
a green half circle appears.
- Hold down the LMB, and you can raise the surface either with one click, or by dragging.
Similarly hold down the RMB, and you can lower the terrain. It does take a little getting used to.
- We are just trying to create small sand dunes.
The other controls in this window are: Raise to used in conjunction with
Distance slider, so one click will be a certain set number of units to raise or lower.
Smooth
does what it says.
Spatial if checked limits/increases the size of the ground in the lateral/horizontal plane that
is moved with one click, and the green circle changes size accordingly.
This Radius is changed on the slider.
If you click on the drop down under Axis you can manipulate the terrain in other Axes.
If you check the Autosew box, Hammer will attempting to repair any gaps you've created through overzealousness. It will also tell you if it couldn't do so.
- A good thing about the tool is, if you don't like what you've done, you can change it all back to a flat surface,
by closing The Displacement Paint Geometry window, and clicking on Destroy.
You can then start again.
- In fact do that now, so your terrain is completely flat again, as we need to put the 'non-sand' paths in. I am doing it this way for easiness, but you can of course place strategically; rocks, corrugated iron, pallets and doors etc. as in the Coast levels.
- Select a gravel texture in the Texture Browser. I used nature/gravelfloor001a
- Make a couple of paths across the terrain, one unit thick is fine, and place them on the displacement brush
This is how I put mine.
- Now go back up to Step 12 above, and play with your terrain until you are happy with it. Note that it is important to keep the area around
the paths fairly flat, or they will become buried and Gordon will have no chance.
Entitiy Placement
- As I indicated in the intro, the main entity is the one that tells the Antlions when Gordon is on the sand.
This is a Env_player_surface_trigger . So click on the Entity tool
 and select Env_player_surface_trigger
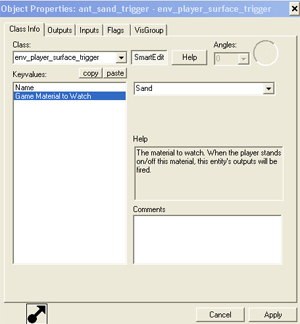
- Press ALT+Enter for the Properties and give it a Name.
ant_sand_trigger.
- Game Material to Watch is of course Sand
- We'll set the Outputs once we have the other entities in.
- Put an npc_antlion in the map, doesn't matter where as you won't see it. This will act as a template for the
npc_antlion_template_maker.
- Open Properties of the npc_antlion
Give it a Name antlion_1
Start Burrowed Yes
Alert Radius 512
- Click on the Flags tab;
Check: Burrow when eluded:
Fall to ground:
Fade Corpse:
Think outside PVS:
Template NPC.
- Put a npc_antlion_template_maker into the map.
- Open the Properties give it a Name antlion_spawner
Start Disabled Yes
Num. of NPC's 5
Frequency 0.2
Max Live NPC's 4
Name of template NPC antlion_1 (Our invisible antlion)
Spawn radius 512
Spawn target !player
Initial antlions in the pool 5
Max antlions in the pool 5
Pool regen amount 3
Pool regen time 20
- In the Flags tab:
Check Random Spawn Node and Try to spawn close to target
- We need to put in some Info_node_hint entities, these will be where the Antlion
spawn.
- Click on the entity tool, and select and place three or four Info_node_hint entities. Place them on the ground in the
3d view they will then be the right amount above the ground.
- Open the Properties
(You can do this by Map | Entity report select them all and click on the
Properties button.)
Hint Antlion:Burrow point
Node FOV 180 Degrees
Start hint disabled No
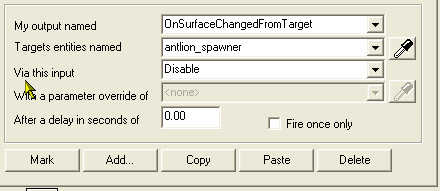
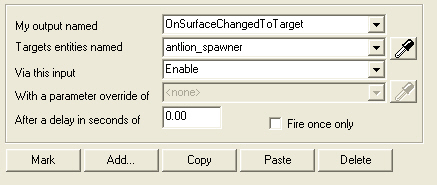
- Reopen the Properties of the Env_player_surface_trigger
Go to the Outputs tab and add as follows:
When player gets off the sand, stop spawning
When player treads on the sand, start spawning
- Put a shotgun and some ammo_buckshot near your Info_player_start and some light entities, environment sunlight, whatever.
- Compile your map.
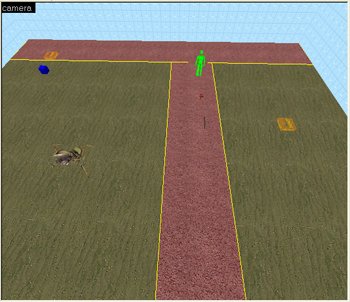
In the Coast levels, there are ways of jumping from rock to rock, on corrugated iron sheets, doors or wooden pallets, that just happen to be lying around and so avoid being attacked. Let's do that.
- Click on the entity tool and select a prop_physics place it on the sand near the path.
- Open the Properties and for World Model browse to
models/props_debris/metal_panel02a.mdl Click apply. Make sure the panel is above the ground.
- You can now duplicate it (select, hold down SHIFT and drag) or you can select a different model entirely.
- Note that rocks are prop_static entities
- I haven't experimented but it might be interesting to see how other textures can be made sensitive to the player and what effects you might be able to link to that.
The next tutorial is "33. Ant_Lions Spawn and Attack" and can be found here.
|