An intermediate tutorial, it will try to give as much step by step as possible, but assumes you have
Basic knowledge like making a room, placing entities and texturing.
This is an extension of the tutorial on cameras. Many people ask how to set up several cameras linked to one screen which can be cycled through via a button, as in the prison levels in Halflife2; this tutorial aims to illustrate that. It shows how to set up three cameras on one monitor. At the monitor there is a button which when the player presses it, changes the view from one camera to another.
- There are no details in this tutorial on constructing the rooms for this, I will just cover the basic requirements for getting this to work. The VMF at the bottom of the page comprises four rooms; three populated with NPC's and various props and a camera in each. The fourth room has the monitor. If you just want to get the principles, download the VMF and look at it with the tutorial.
- The principle is the same no matter how many cameras you have, a func_button is set up next to the monitor/screen, which triggers three separate logic_relay entities. When triggered these turn on and off the individual point_camera entities. The cameras also rotate (by means of func_rot_button entities) giving a 90 degree scan of each room. This is controlled by a logic_timer and I will deal with this at the end of the static setup.
THE CAMERAS
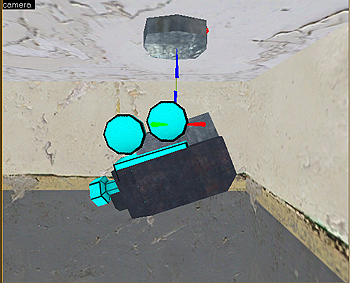
- Since the point_camera entity is invisible in the game, you need a brush or model based one. There are two combine cameras in the world models. I made a brush based one, which you can get in the prefabs section (there are two in fact) or in the vmf. There is a rather good model on 'Mappping-area.com' (Link on my 'Materials' page) or you can make your own !
- Place three of these cameras wherever you want them, obviously pointing towards whatever you want showing on the screen. Mine are hanging from the ceiling in the corners of the rooms angled slightly downwards.
- For the static version (camera doesn't move) make each of them a func_brush (Press CTRL+T select func_brush from the drop down)
(I'll deal with the rotating camera version later)
- Open the Properties and give each of them a
Name rotcam1 rotcam2 rotcam3
- Click on the Entity tool, and in the same locations, place each of three point_camera entities. Pointing in the same direction as the cameras you placed and at the same angle.
- Open the Properties of each and give them a
Name cam 1 cam 2 cam3
Parent rotcam1 etc
FOV Field of view, mine are set to 60 (experiment?)
THE MONITOR
- In the fourth room make a brush with the nodraw texture on 64w x 64h x 2 units deep.
- Press CTRL+T and make it a func_monitor
- Open the Face Edit tool and browse to dev/dev_tvmonitor1a put this texture on the front face of the func_monitor If you want to use another monitor have a look here for the different types.
- Open the Properties and give the monitor a
Name mon1
Camera Name cam1
- Make a brush with an appropriate button texture on, whatever size you want for the button, make sure the player can see the monitor while he is pressing the button.
- Press CTRL+T and make it a Func_button
- Open the Properties and give it a
Name monitor_change_button
Sounds Choose from the drop down (In the VMF I have used a separate sound triggered by the logic_relay entities)
- In the Flags tab make sure Don't Move and Use Activates are checked.
Logic_relays
- Place three logic_relays in the map.
- Open the Properties and give them each a
Name lr1 lr2 lr3
Start disabled No
Putting it together
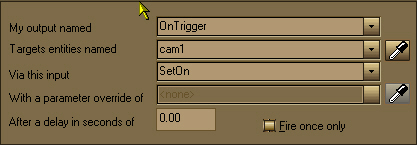
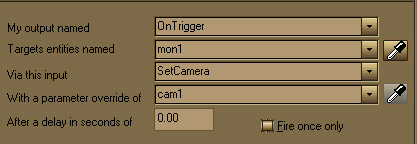
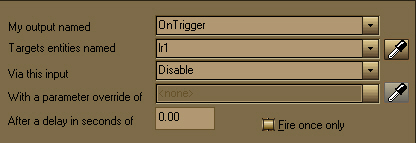
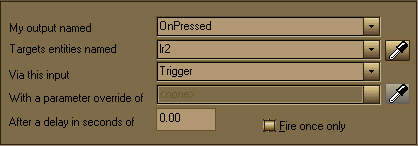
- Open the Properties of the first logic_relay click on the Outputs and Add :
Turns cam1 on
Puts the image from cam1 onto the monitor
Turns itself off
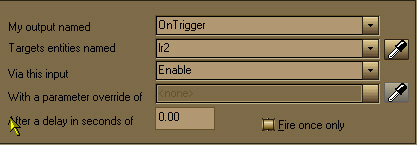
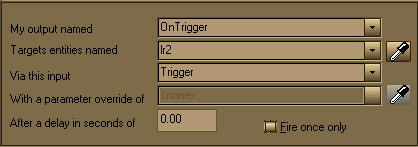
Turns logic_relay 2 on.
Triggers logic_relay 2.
- Open the Properties of the second logic_relay click on the Outputs and Add :
Turns camera 2 on
Sets the monitor to display camera 2
Turns itself off
Turns logic_relay 3 on
Triggers logic_relay 3
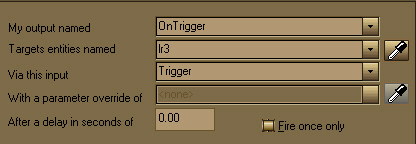
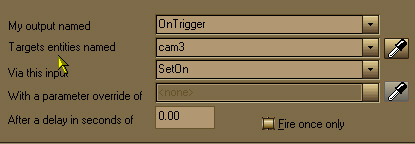
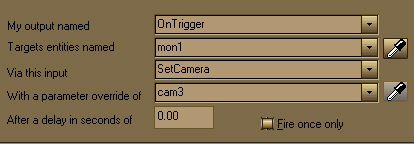
- Open the Properties of logic_relay 3, open the Outputs and Add:
Turns camera 3 on
Sets the monitor to display camera 3
turns itself off
Triggers logic_relay 1, and so the cycle starts again.
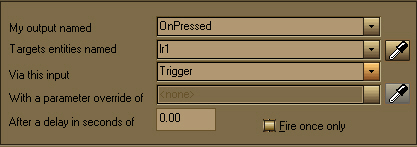
- Open the Properties of the func_button open the Outputs and Add:
starts logic_relay 1
starts logic_relay 2
starts logic_relay 3
- Compile and run the map
ROTATING CAMERAS
The above set up switches between three static cameras, lets look at how to make them rotate.
- If your cameras are brush based, then change the three func_brushes to func_rot_button
- Open the Properties
Speed 10
Distance(deg) 90 (can be anything between 60 and 90 - experiment)
- In the Flags tab make sure Toggle is checked
If your cameras are models, then they will be prop_dynamic entities, and you will have to parent them to a separately made, named, brush (with nodraw texture on ) which you make a func_rot_button
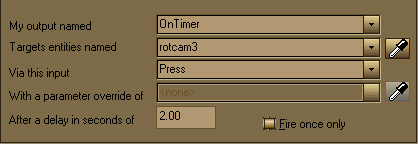
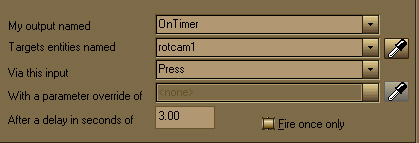
- Place a logic_timer in the map.
- Open the Properties
Name timer
Use random time No
Refire Interval 3 (The timer will fire every three seconds)
- Open the Properties of the Logic_timer and in the Outputs Add:
starts physical camera 1 rotating
starts physical camera 2 rotating
starts physical camera 3 rotating
- Compile and run the map
The next tutorial is
"48 AI_Goal _Lead" and can be found
here.