Good texturing is definitely one of the most important aspects of creating a level. Worldcraft's tools give you easy access to all of the texture properties.
The first interaction you will have with textures will most likely be through the Textures dialog.
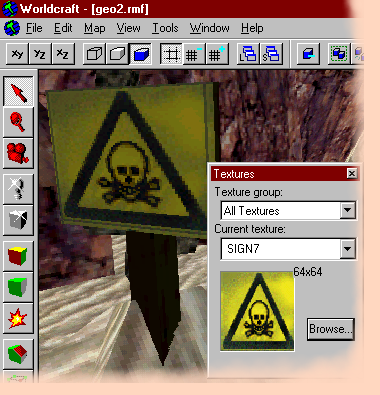
The Textures dialog shows you the current texture that you are working with. Using the Current texture scroll box, you can pick from previously used textures. The Texture group scroll box allows you to choose which of the various texture groups to use if you do not wish to use all of them.
Texture Browser
The Browse... button opens the texture browser, where you can select from all available textures (as dictated by the Texture group selection).
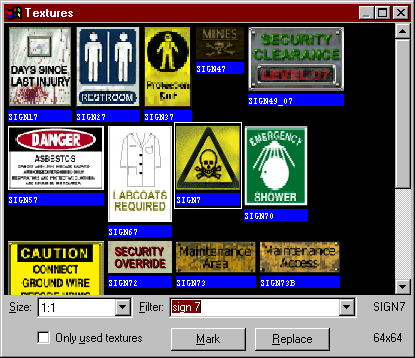
The Size scroll box allows you to set the displayed size of the textures. You can choose from 32x32, 64x64, 128x128, or 1:1 (full size).
The Filter box allows you to type in a string. Any texture that has that string as a part of its name will be displayed. You can specify more than one filter string. For example, if you specify the search string "sign 7", textures such as sign7 and sign37 will be displayed. Previous search strings can be accessed by clicking on the down arrow.
The "Only used textures" option will make the browser only display textures that have been used in your level. This will allow you to narrow your texture usage down and avoid using different textures for the same purpose. This will have an effect on both WAD and WAL type texture systems.
The Mark button will allow you to mark (select) all texture faces that contain the selected texture. You can then adjust those faces as required (textures, surface attributes, etc). This is best used in conjunction with the Face Properties dialog. If the normal "Apply Textures" map tool is used, every face of a brush that has one face selected will have the new texture applied.
The Replace button (also accessible through the Tools menu) will bring up the Replace Textures dialog
Texture Application Mode
You will eventually need to modify a texture in some way. The
Face Properties dialog (Texture Application mode) allows you to manipulate the texture properties of selected brush faces. There are a number of texture attributes available:
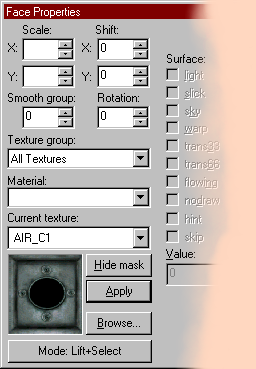
Note: while in Texture Application Mode, you can select multiple faces of a brush by ctrl-clicking them, or you can select the entire brush by shift-clicking one of the brush faces.
Scale (X/Y)
You can modify the scale of a texture to shrink or enlarge it. Numbers less than 1 shrink, and over 1 enlarge. You can use negative values to mirror the texture in one or both planes.
Shift (X/Y)
This simply allows you to shift the texture around in the X and/or Y planes.
Note: The shift values are in relation to the grid settings. It can be extremely helpful to align a brush first to the grid, then move the brush to its intended location with Texture Lock enabled.
Smooth Groups
Half-Life's compile tools allow you to specify a "smooth value" angle. Brushes that meet at or under this angle will be "smoothed" to appear rounded.
Rotation
Rotation allows you to rotate (!) the texture on the brush face.
Texture Group
You can choose from which texture group you will browse textures from
Material
Half-Life allows you to specify the material type of textures. Material type will affect the sounds made on those textures (walking, ricochets, etc).
Quake 2 Parameters
When using the Quake II map format, the surface and content attribute boxes are enabled, allowing you to take full advantage of the specific Q2 surface properties.
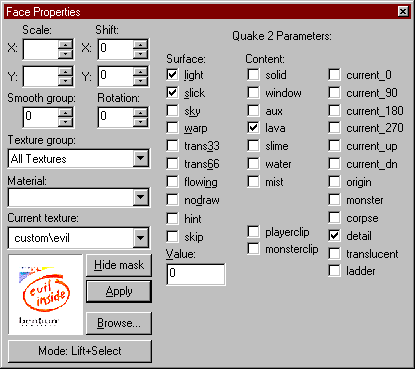
Surface
light - Emit light from the surface, the amount of light is specified in the 'value' field. The color of the light depends on the average color of the texture.
slick - Makes surface slippery (use with discretion)
sky - This surface is sky, the texture will not be drawn, but the background sky box is used instead
warp - The surfaces warps (like water textures do)
trans33 - Surface is 33% translucent, for stuff like windows/force fields
trans66 - Surface is 66% translucent.
flowing - The texture wraps in a downward 'flowing' pattern (warp must also be set). Control the direction of flow by rotating the texture.
nodraw - Used for non-fixed-size brush triggers and clip brushes
hint - Indicates a primary BSP split. Good for telling the bsp where to cut up your map. Most useful when used in conjunction with the gl_showtris console command.
skip - completely ignore, allowing non-closed brushes
Content
solid - default for all brushes
window - brush is a window
aux - not used
lava - the brush is lava
slime - the brush is slime
water - the brush is water
mist - creates a non-solid brush
playerclip - Player can not pass the brush (other things can)
monsterclip - monster's can't pass the brush (player and other things can)
current* - Direction of current in the brush (usually water brushes)
origin - Special brush used for specifying origin of rotation for rotating brushes
monster - should never be on a brush, only in game
corpse - not used
detail - This is special, explained below
translucent - Use for opaque water that does not block bsp views
ladder - Brushes with this content allows a player to move up and down a vertical surface
Note: When modifying the content properties of a brush, each brush face must have the same contents enabled. Otherwise, you will get a "Brush with mixed contents" error.
Related Topics: